This mission involves implementing the product management function of a shopping mall using Spring Web MVC. The mission provides code that allows you to check the product management page using Thymeleaf. To achieve this, you need to implement the CRUD API for product management and connect the product list page for users and the product management page for administrators.
- Product List Page Connection
- Complete the page where the product list is displayed using the
index.htmlfile. - Implement access to the product list page when accessing the
/URL. - Return the
index.htmlpage when accessing the/URL.
- Complete the page where the product list is displayed using the
- Product
- Implement the function to edit product information.
- Product information includes:
- Product ID
- Product Name
- Product Image
- Product Price
- Money Domain
- Must have a value of 0 or more.
- Add Product Management CRUD API functions
- Create Product API
- Retrieve Product List API
- Edit Product API
- Delete Product API
- Admin Tool Page Connection
- Complete the product management page using the
admin.htmlfile and the product management CRUD API. - Complete the functions in the
admin.jsfile. - Ensure access to the admin tool page when accessing the
/adminURL.
- Complete the product management page using the
This mission involves implementing the shopping cart function. This stage is broadly divided into authentication and the implementation of the shopping cart function. The information about which user's cart to add or remove products from is authenticated using Basic Auth. User settings are handled on the settings page. The shopping cart function must be implemented based on authentication, allowing products to be added to the cart, removed from the cart, and the cart list to be viewed.
- Implement User Functions
- User information includes:
- User selection functionality on the settings page.
- Implement Shopping Cart Functions
- Add product to the cart.
- Remove product from the cart.
- View cart list.
- User information should be authenticated using the Authorization field in the request header.
- Shopping Cart Page Connection
- Add product to the cart.
- View and remove products from the cart.
이 미션은 Spring Web MVC를 이용하여 쇼핑몰의 상품 관리 기능을 구현하는 미션입니다.
상품 관리 페이지를 Thymeleaf를 이용하여 확인할 수 있도록 코드를 제공합니다.
이를 위해 상품 관리 CRUD API를 구현하고 사용자를 위한 상품 목록 페이지와 어드민을 위한 상품 관리 페이지를 연동해야 합니다.
-
상품 목록 페이지 연동
-
index.html파일을 이용하여 상품 목록이 노출되는 페이지를 완성 -
/url로 접근할 경우 상품 목록 페이지를 조회할 수 있도록 구현 -
/url로 접근할 경우index.html페이지 반환
-
-
상품
- 상품 정보를 수정하는 기능
- 상품이 가지고 있는 정보
- 상품 ID
- 상품 이름
- 상품 이미지
- 상품 가격
-
돈 도메인
- 0이상의 값을 가진다.
-
상품 관리 CRUD API 기능 추가
- 상품 생성 API
- 상품 목록 조회 API
- 상품 수정 API
- 상품 삭제 API
-
관리자 도구 페이지 연동
-
admin.html파일과 상품 관리 CRUD API를 이용하여 상품 관리 페이지를 완성 -
admin.js파일의 기능을 완성한다. -
/adminurl로 접근할 경우 관리자 도구 페이지를 조회할 수 있어야 한다.
-
이 미션은 장바구니 기능을 구현하는 미션입니다. 이번 단계는 크게 인증과 장바구니 기능 구현으로 나눌 수 있습니다. 어떤 사용자의 장바구니에 상품을 추가하거나 제거할 것인지에 대한 정보는 Basic Auth를 이용하여 인증을 하도록 합니다. 사용자 설정은 설정페이지에서 다룹니다. 장바구니 기능은 인증 기반으로 기능을 구현하고 장바구니에 상품 추가, 제거, 목록 조회가 가능해야 합니다.
- 사용자 기능 구현
- 사용자가 가지고 있는 정보
- 사용자 설정 페이지 연동
- 사용자를 선택하는 기능
- 장바구니 기능 구현
- 장바구니에 상품 추가
- 장바구니에 담긴 상품 제거
- 장바구니 목록 조회
- 사용자 정보는 요청 Header의 Authorization 필드를 사용해 인증 처리
- 장바구니 페이지 연동
- 장바구니 상품 추가
- 장바구니 목록 조회 및 제거
넥스트스텝 과제 중에 테스트 코드를 작성하고 통과한 후 Pull Request를 올렸으나, 리뷰어님께서 테스트 코드를 다시 확인해달라고 요청하셔서 동일한 코드임에도 실행 결과가 다른 이유에 대해 정리하게 되었습니다.
- 특정 테스트 코드의 실행 결과가 상이했습니다. 제가 실행할 때는 테스트가 통과되었지만, 리뷰어님의 실행에서는 실패하거나 그 반대로 동작했습니다.
- 제가 실행할 때 테스트 코드에서 발생한 오류 메시지는 jackson 라이브러리와 관련된 내용이었습니다.
com.fasterxml.jackson.databind.exc.InvalidDefinitionException: Cannot construct instance of `cart.dto.CartCreateDto` (no Creators, like default constructor, exist): cannot deserialize from Object value (no delegate- or property-based Creator)
at [Source: (org.springframework.util.StreamUtils$NonClosingInputStream); line: 1, column: 2]Jackson 2.13.0 버전부터는 NoArgsConstructor 어노테이션을 추가하지 않아도 된다고 알고 있었는데, 제 코드에서는 계속해서 역직렬화 시에 no args constructor가 없다는 오류가 발생했지만, 리뷰어님의 실행에서는 정상적으로 동작했습니다.
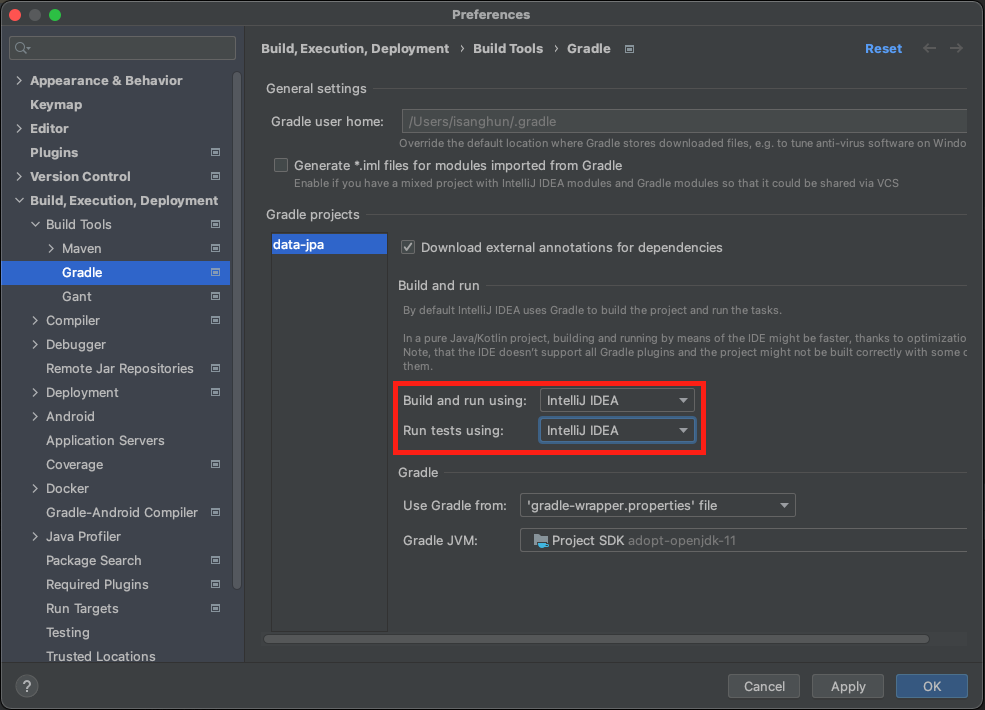
- 빌드 및 실행 방식을 제가 Intellij로 설정하고 사용하고 있었습니다. 그러나 리뷰어님은 Gradle로 설정한 것이 차이점이었습니다.
- Intellij와 Gradle은 서로 다른 클래스로더 방식으로 작동합니다.
그래서 수동으로 라이브러리 설정을 시도해보았습니다.
- 여전히 Intellij에서 빌드 및 실행은 유지하고
- build.gradle 파일에 Jackson 라이브러리를 추가하고 수동으로 등록하였습니다.
- 기존의 빌드 결과물인
out폴더를 삭제하더라도 라이브러리가 제대로 작동하지 않았습니다. 여전히 위와 같은 오류가 발생했습니다.
그러나 의도한대로 라이브러리가 적용되지 않아 테스트 코드가 작동하지 않았습니다! Build and Run 설정 창을 다시 살펴보니, IDE에서 실행할 때 모든 Gradle 플러그인을 지원하지 않는다는 사실이 명시되어 있었습니다. 이게 바로 이 의미였던 것입니다.
