Maintainer: @kosgrz Co-Maintainer: @mickmister
Start and join voice calls, video calls and use screen sharing with your team members with a Skype for Business plugin for Mattermost.
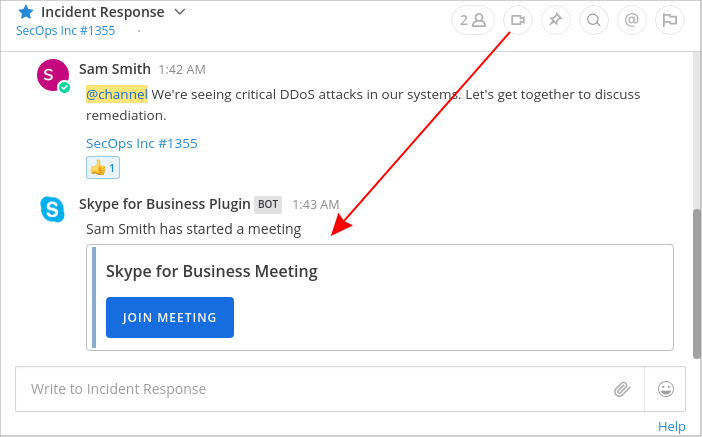
Clicking a video icon in a Mattermost channel posts a message that invites team members to join a Skype for Business meetings call.
Originally developed by kosgrz.
- Install the plugin
- Download the latest version of the plugin from the GitHub releases page
- In Mattermost, go to System Console -> Plugins -> Management
- Upload the plugin
- Register an Azure Active Directory app
- Sign in to https://portal.azure.com/#home
- On the left-hand sidebar, select Azure Active Directory, then navigate to App registrations -> New application registration
- Set the following values:
- Name: Mattermost Skype for Business Plugin - [your company name]
- Supoorted account types: Accounts in any organizational directory and personal Microsoft accounts (e.g. Skype, Xbox, Outlook.com)
- Redirect URI (optional): Web, then enter "https://your-mattermost-url.com/plugins/skype4business/api/v1/auth_redirect" replacing
https://your-mattermost-url.comwith your Mattermost URL
- Click Register to submit
- Grant permissions for your application in Azure Active Directory
- Select API permissions in the application sidebar menu, then Add a permision -> Skype for Business -> Delegated permissions
- Click the Meetings dropdown, then check
Meetings.ReadWrite. - Click Add permissions to submit
- Click Grant admin consent for ..., then Yes to confirm
- Allow implicit flow in Azure Active Directory
- Select Manifest in the application sidebar menu
- Set the
oauth2AllowImplicitFlowandoauth2AllowIdTokenImplicitFlowvalues to true - Click Save
- Configure the plugin in Mattermost
- Select Overview in the application sidebar menu
- Copy the Application (client) ID value
- In Mattermost, go to System Console -> Plugins -> Skype for Business, and enter the Application ID you copied on the previous step
- Choose
Onlineas the Skype for Business Product Type. - Click Save
- Enable the plugin
- Go to System Console -> Plugins -> Management and click Enable underneath the Skype for Business plugin
- Try it out
- Go to a Mattermost channel and click the Skype for Business icon in the channel header
- A dialog will open asking you to sign in to microsoftonline.com
- Once signed in, the dialog will close and a new message posted to the channel, with a link to the newly created meeting
- By clicking the "Join meeting" button, you will be redirected to a meet. page, which in turn opens a Skype for Business client installed on your computer or smartphone to join the meeting
- Install the plugin
- Download the latest version of the plugin from the GitHub releases page
- In Mattermost, go to System Console -> Plugins -> Management
- Upload the plugin
- Configure the plugin
- Go to System Console -> Plugins -> Skype for Business
- Choose
Serveras the Skype for Business Product Type - Enter the Server Domain of your Skype for Business server instance. For example,
contoso.com. - Enter the Skype for Business Bot Username of your bot user created in the Skype for Business domain. For example, [email protected]. We strongly recommend using a dedicated bot account for this plugin, rather than an existing Skype for Business user account.
- Enter the Skype for Business Bot Password of your bot user created in the Skype for Business domain.
- Click Save
- Enable the plugin
- Go to System Console -> Plugins -> Management and click Enable underneath the Skype for Business plugin
- Try it out
- Go to a Mattermost channel and click the Skype for Business icon in the channel header
- Observe a new message posted to the channel, with a link to the newly created meeting
- By clicking the "Join meeting" button, you will be redirected to a meet. page, which in turn opens a Skype for Business client installed on your computer or smartphone to join the meeting
This plugin contains both a server and web app portion.
Use make dist to build distributions of the plugin that you can upload to a Mattermost server for testing.
Use make check-style to check the style for the whole plugin.
Inside the /server directory, you will find the Go files that make up the server-side of the plugin. Within there, build the plugin like you would any other Go application.
Inside the /webapp directory, you will find the JS and React files that make up the client-side of the plugin. Within there, modify files and components as necessary. Test your syntax by running npm run build.


