-
Notifications
You must be signed in to change notification settings - Fork 3
1. Setup
Before you can upload the gameBadge3 code to your Raspberry Pi Pico, you'll need to complete a few prerequisite setup steps. This page walks you through these steps. Do not skip any of these steps; be sure to complete each one to get your gameBadge3 up and running!
- Download the appropriate version of the Arduino IDE for your platform (Windows, macOS, or Linux). You can use either a 2.0.x version of the IDE or the 1.8.x (legacy) version - both will work for the gameBadge3.
- Install the Arduino IDE. If you need help, refer to the installation instructions on the Arduino website.
To set up the Pico as a mass storage device, there are two Arduino libraries that you need to install, which were created by Adafruit - SdFat and SPIFlash.
-
From within the Arduino IDE, open up the Library Manager ( Tools menu > Manage Libraries).
-
In the search field of the Library Manager, enter
adafruit sdfat. -
Find the library called "SdFat - Adafruit Fork", and click the
Installbutton.
-
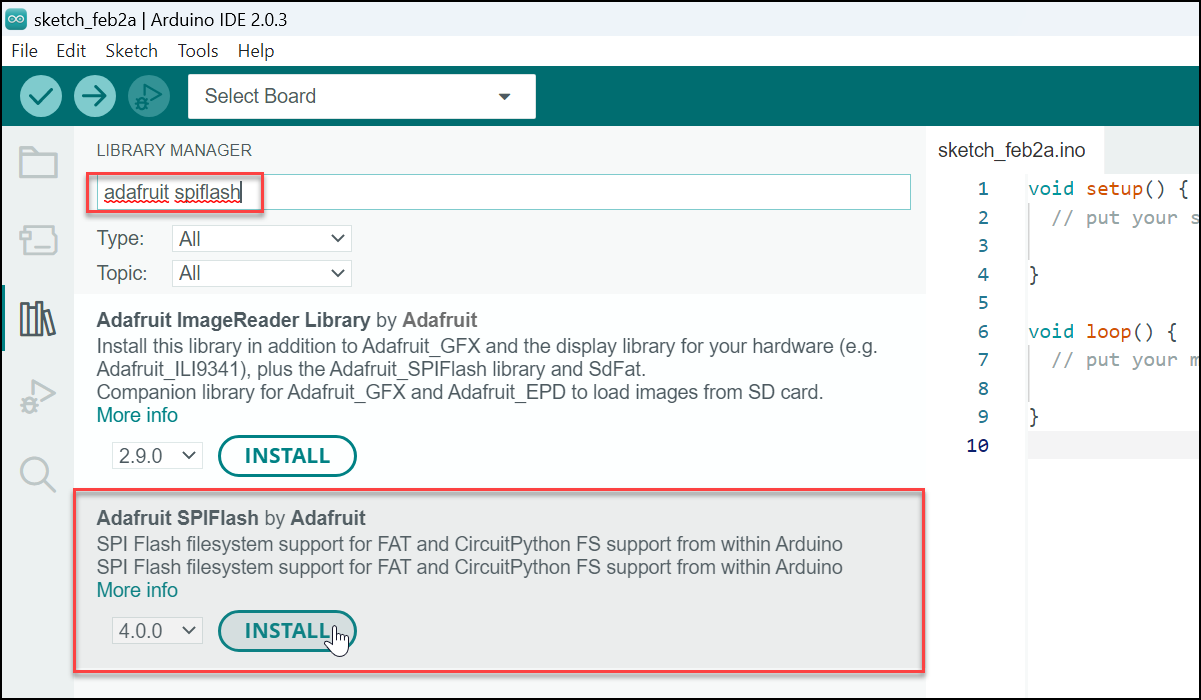
While still in the Library Manager, search for the library called "Adafruit SPIFlash", and click the
Installbutton to install it.
-
If prompted to install the library dependencies, click
Install All.
The next step is to install the Pico library so your board is recognized and usable within the Arduino IDE.
-
From within the Arduino IDE, open File > Preferences.
-
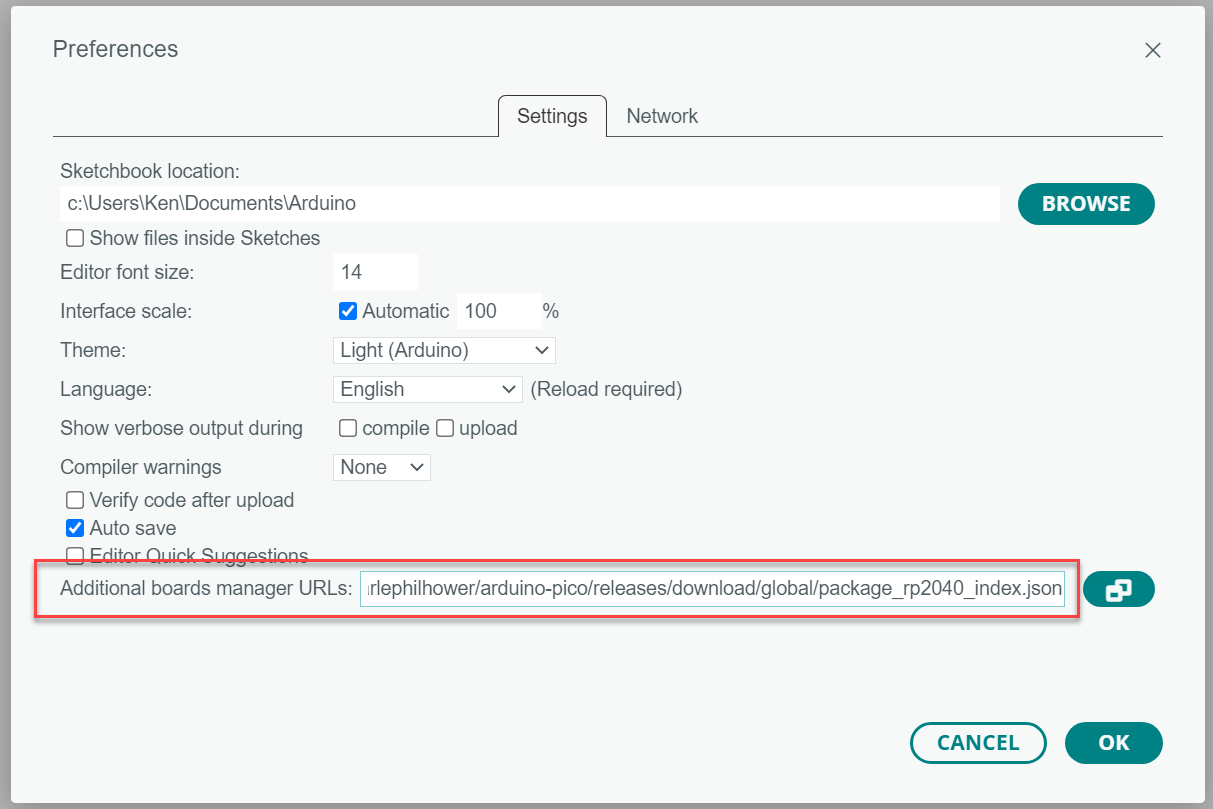
In the Preferences dialog, enter the following URL in the "Additional Boards Manager URLs" field:
https://github.com/earlephilhower/arduino-pico/releases/download/global/package_rp2040_index.jsonand click OK.
-
Click on the Tools menu, and choose Board > Boards Manager.

-
In the Boards Manager dialog, find the board called "Raspberry Pi Pico/RP2040" by Earle F. Philhower. Click the Install button to install version 2.7 of this board profile.

-
After the board profile installs, close the Boards Manager by clicking the icon on the sidebar:

Next, you will need to turn your Pico into a flash drive by formatting the top half of the 2MB flash as a file system.
-
Download the gameBadge3 git repository from https://github.com/benheck/gameBadge3, by clicking
Code>Download ZIP.
-
Open the ZIP file you downloaded, and extract the contents into a folder.
-
Within the Arduino IDE, load the
SdFat_format.inosketch. The file is located atcode\utilities and test code\SdFat_format. -
Once the sketch is open, click on the Tools menu, select
Boards>Raspberry Pi Pico/RP2040>Raspberry Pi Pico W:
-
Click
Tools>Flash Size>2MB (Sketch: 1MB, FS: 1MB). This will configure the Pico to split the 2MB flash into two portions. 1MB will be used for the sketch, and the remaining 1MB will be used as a mass storage device.
-
Click
Tools>CPU Speed>125MHz:
-
Click
USB Stack>Adafruit TinyUSB:
-
Plug the gameBadge3 into your USB port, and turn it on while holding down the white BOOTSEL button in the back. This will put the Pico into UF2 mode, which mounts it as a file system that you can copy flash binaries to.

-
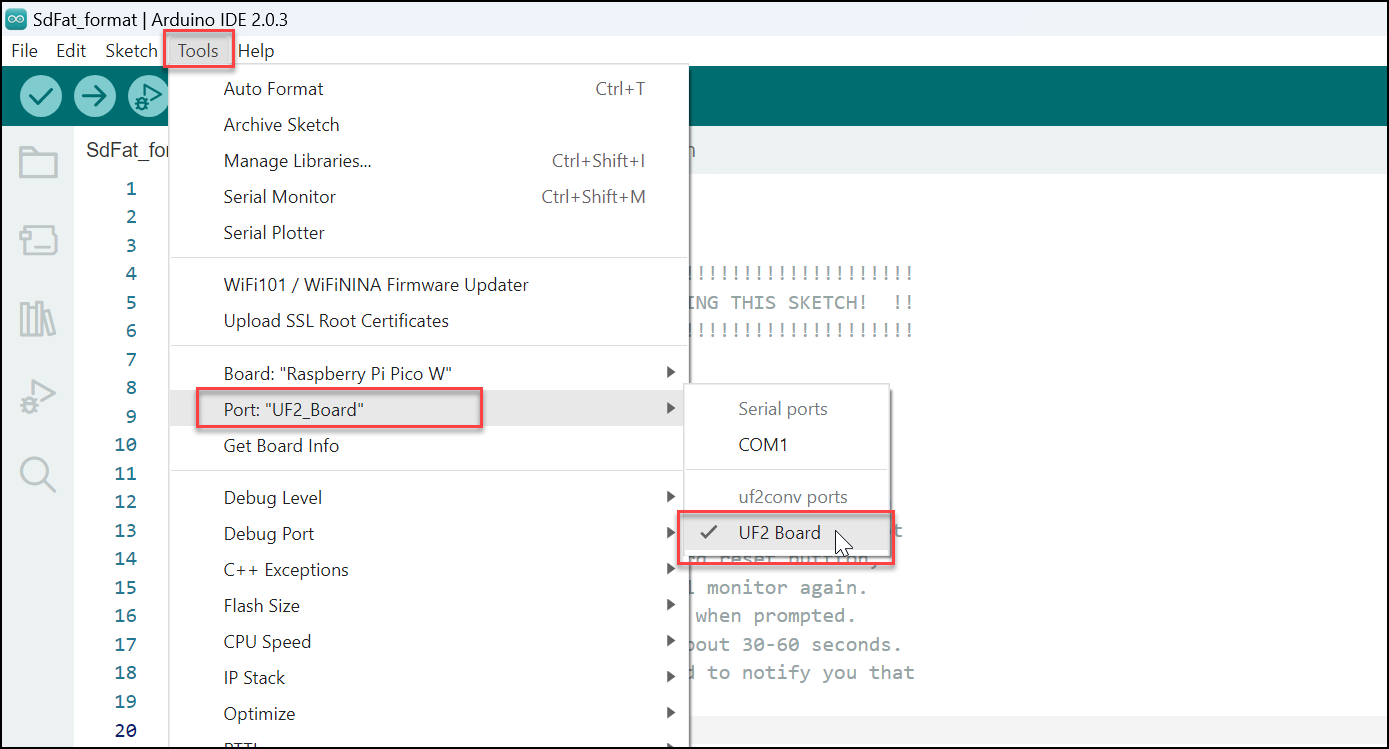
In the Arduino IDE, select UF2 as the port, by clicking on
Tools>Port>UF2 Board:
-
Click the
Uploadbutton in the Arduino IDE.
-
After the sketch uploads, the gameBadge3 will reset and reconnect to your computer. You'll then need to select the USB port that it connected on.
Click
Tools>Portand choose the appropriate COM port. In the following screen shot, the gameBadge3 usedCOM3, but this may be different for your computer.
-
Next, you'll need to send the gameBadge3 a serial command to tell it to format the flash storage as a file system. You'll do this with the Arduino serial monitor tool.
In the Arduino IDE, open the Serial Monitor by clicking
Tools>Serial Monitor:
-
The Serial Monitor window should open. In the Serial Monitor, type
OK(in CAPITAL letters) and press Enter. This will instruct theSdFat_formatsketch you just uploaded to format the file system.When it's done, you should see the message that the chip was formatted.

-
While still in the Arduino IDE, open up the
msc_external_flashsketch. You'll find this in thecode\utilities and test code\msc_external_flashfolder of the gameBadge3 git repository that you downloaded earlier. -
Once that sketch is open, upload the sketch to the Pico. This sketch will enable the Pico to be presented to your operating system as a flash drive.
-
Your Pico should disconnect from the computer and then reconnect as a flash drive with 1MB of storage! You can now move on to loading up the code onto your gameBadge3!
Next, you'll need to import the gameBadge3 libraries from the git repository into your Arduino library collection. There are two custom libraries you will need:
- pico_ST7789 - enables the Pico to interface with an LCD that uses the ST7789 chipset.
- gameBadgePico - the gameBadge3 game engine
-
Determine which folder Arduino is storing your library files in. The default location will be one of the following:
-
Windows:
C:\Users\{username}\Documents\Arduino\libraries -
macOS:
/Users/{username}/Documents/Arduino/libraries -
Linux:
/home/{username}/Arduino/libraries
If you are having trouble finding your library folder, take a look at this Arduino help article.
-
Windows:
-
Navigate to the location that you extracted the gameBadge3 git repository to in an earlier step.
-
Copy the gameBadgePico folder and the pico_ST7789 folder from the
code\Arduino librariesinto the Arduino library location from step 1. -
When done correctly, you should see those two folders along with the other Arduino libraries that you previously installed:

The final step is to go ahead and upload the code onto your gameBadge3!
-
Open the Arduino IDE.
-
Plug your gameBadge3 into your computer's USB port, and turn it on.
-
Check to ensure that you're using the correct board settings:
-
Board:
Raspberry Pi Pico W - Port: The COM port that your Pico is connected to
-
Flash Size:
2MB (Sketch: 1MB, FS: 1MB) -
USB Stack:
Adafruit Tiny USB
-
Board:
-
Click the Upload button:

One the upload is complete, your gameBadge3 will restart. You should then be greeted with the MGC 2023 splash screen.
Congratulations - your gameBadge3 is now ready to use!